I described basics of vector layers manipulation in the previous part of the series. With my goal in mind (fully functional custom plugin capable of writing an attribute value from a source layer to a target layer based on a feature distance), I’d like to discuss spatial indexing and nearest neighbor analysis.
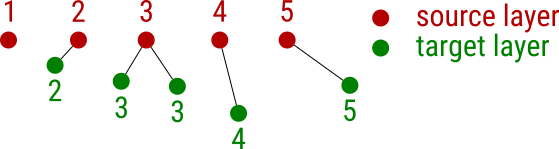
The picture above illustrates the task that can be solved solely by using QGIS API. Imagine you’re given a source layer with an attribute filled with values. You’re given a target layer as well, sadly though, the values in this layer are missing (not so rare in the GIS world, right?). Yet you know that the missing attribute value of each feature in the target layer can be filled by the value of its nearest neighbor from the source layer. How do you do that?
Generating dummy data
Let’s create two memory data sets with id and value attributes. Both of them will have ten features.
from qgis.core import QgsMapLayerRegistry, QgsVectorLayer, QgsFeature, QgsGeometry, QgsPoint, QgsSpatialIndex
from qgis.utils import iface

source_layer = QgsVectorLayer("point?crs=epsg:4326&field=id:integer&field=value:integer", "Source layer", "memory")
target_layer = QgsVectorLayer("point?crs=epsg:4326&field=id:integer&field=value:integer", "Target layer", "memory")

def create_dummy_data():

    source_layer.startEditing()
    target_layer.startEditing()

    feature = QgsFeature(source_layer.pendingFields())

    for i in range(10):
        feature.setGeometry(QgsGeometry.fromPoint(QgsPoint(i, i)))
        feature.setAttribute("id", i)
        feature.setAttribute("value", i)
        source_layer.addFeature(feature)

    feature = QgsFeature(source_layer.pendingFields())

    for i in range(10):
        feature.setGeometry(QgsGeometry.fromPoint(QgsPoint(i + i, i)))
        feature.setAttribute("id", i)
        target_layer.addFeature(feature)

    source_layer.commitChanges()
    target_layer.commitChanges()

    QgsMapLayerRegistry.instance().addMapLayer(source_layer)
    QgsMapLayerRegistry.instance().addMapLayer(target_layer)

create_dummy_data()
Writing values from the nearest neighbor
The actual nearest neighbor analysis can be done in ten lines of code! First, the qgis.core.QgsSpatialIndex is built from all the source_layer features. Then, you iterate over the target_layer features and for each of them, gets only one (nearestNeighbor(f.geometry().asPoint(), 1)[0]) nearest neighbor. At last, you just write the nearest neighbor’s attribute value to the target layer and commit changes. Just use the following code with the code above.
def write_values_from_nn():
    source_layer_index = QgsSpatialIndex(source_layer.getFeatures())
    source_layer_features = {feature.id(): feature for (feature) in source_layer.getFeatures()}
    target_layer_features = target_layer.getFeatures()

    target_layer.startEditing()

    for f in target_layer_features:
        nearest = source_layer_index.nearestNeighbor(f.geometry().asPoint(), 1)[0]
        value = source_layer_features[nearest].attribute("value")
        target_layer.changeAttributeValue(f.id(), 1, value)

    target_layer.commitChanges()

write_values_from_nn()
Missing pieces or what’s next
I’m one step closer to my goal. What’s missing?
- capabilities checks: does the target layer support edits? Check the layer data provider capabilities to find out.
- user logging: notices, warnings or errors are completely missing. It will be great to have them shown inside
qgis.gui.QgsMessageBar.
- custom attributes: this version expects both layers to have the same attribute with the same data type.
- GUI: a very simple PyQt widget will turn this console-based script into a custom plugin. That’s what’s going to be next.
As mentioned in previous part of the series, the QGIS Python console is an entry point to GIS workflow automation within QGIS. Remember there’s an iface object representing qgis.gui.QgisInterface instance within the console that gives you access to the whole QGIS GUI. Let’s see what we can do inside the console.
Loading vector layers folder
import glob
from qgis.core import QgsMapLayerRegistry, QgsVectorLayer

def load_folder(folder):
    VALID_EXTENSIONS = ('.geojson', '.gpkg', '.shp')
    files = [f for f in glob.glob("{}/*".format(folder)) if f.endswith(VALID_EXTENSIONS)]

    for f in files:
        layer = QgsVectorLayer(f, f.split('/')[-1], 'ogr')

        if not layer.isValid():
            iface.messageBar().pushCritical("Failed to load:", f)
            continue

        QgsMapLayerRegistry.instance().addMapLayer(layer)

load_folder("path/to/your/vector/files/folder")
QgsMapLayerRegistry represents Layers Panel as present in the QGIS GUIiface.messageBar() returns the message bar of the main app and lets you notify the user of what’s going on under the hoodQgsVectorLayer represents a vector layer with its underlying vector data sets
Editing active layer attribute table
The following code demonstrates the possibility to edit vector layer attribute table via console.
- Any attribute to be written has to come in form of a
qgis.core.QgsField - this is more or less an encapsulation of an attribute name and its type (PyQt4.QtCore.QVariant to be precise)
- The underlying data provider has to be capable of attribute addition (
caps & QgsVectorDataProvider.AddAttributes)
QgsVectorLayer.addAttribute method returns boolean rather than throwing an exception
from qgis.core import QgsField
from qgis.gui import QgsMessageBar
from PyQt4.QtCore import QVariant


def edit_active_layer(attr_name, attr_type):
    layer = iface.activeLayer()
    caps = layer.dataProvider().capabilities()

    if caps & QgsVectorDataProvider.AddAttributes:
        layer.startEditing()
        if layer.addAttribute(QgsField(attr_name, attr_type)):
            iface.messageBar().pushMessage("Attribute {0} was successfully added to the active layer.".format(attr_name), QgsMessageBar.SUCCESS)
            layer.commitChanges()
        else:
            iface.messageBar().pushMessage("Attribute {0} was not added. Does it already exist?".format(attr_name), QgsMessageBar.CRITICAL)
            layer.rollBack()

edit_active_layer("new_string_attribute", QVariant.String)
The whole series aims to present a plugin capable of writing a new attribute and its value to an existing layer. Thus, this code might come handy in the future.
Creating a new vector layer
It’s possible to create a whole new vector layer with QGIS Python console. I present a very simple create_new_layer function, yet I hope you can imagine the ways it can be tweaked.
from qgis.core import QgsField, QgsFields, QgsVectorLayer, QgsFeature, QgsGeometry, QgsPoint
from PyQt4.QtCore import QVariant

def create_new_layer():
    filename = "/path/to/your/vector/file.gpkg"

    fields = QgsFields()
    fields.append(QgsField("attr1", QVariant.String))
    fields.append(QgsField("attr2", QVariant.Int))

    file = QgsVectorFileWriter(
        filename,
        "UTF8",
        fields,
        QGis.WKBPoint,
        QgsCoordinateReferenceSystem(4326),
        "GPKG"
    )

    layer = QgsVectorLayer(filename, filename.split("/")[-1], "ogr")
    QgsMapLayerRegistry.instance().addMapLayer(layer)

    if not layer.dataProvider().capabilities() & QgsVectorDataProvider.AddAttributes:
        pass

    feature = QgsFeature(layer.pendingFields())
    feature.setGeometry(QgsGeometry().fromPoint(QgsPoint(0, 0)))
    feature.setAttribute("attr1", "attr1")
    feature.setAttribute("attr2", 2)

    layer.startEditing()

    if layer.addFeature(feature, True):
        layer.commitChanges()
    else:
        layer.rollBack()
        iface.messageBar().pushMessage("Feature addition failed.", QgsMessageBar.CRITICAL)

create_new_layer()
Those were just few examples of what can be done with QGIS API and Python console. Next time, I’d like to focus on spatial joins inside QGIS - another step to the final plugin.
QGIS 2.1x is a brilliant tool for Python-based automation in form of custom scripts or even plugins. The first steps towards writing the custom code might be a bit difficult, as you need to grasp quite complex Python API. The QGIS Plugin Development series (see the list of other parts at the end of this article) targets pitfalls and traps I’ve met while learning to use it myself.
The outcome of the series is going to be a fully functional custom plugin capable of writing attribute values from a source layer nearest neighbour to a target layer based on their spatial proximity.
In this part, I’ll mention the basics a.k.a. what is good to know before you start.
Documentation
Different QGIS versions come with different Python API. The documentation is to be found at https://qgis.org, the latest being version 2.18. Note that if you come directly to http://qgis.org/api/, you’ll see the current master docs.
Alternatively, you can apt install qgis-api-doc on your Ubuntu-based system and run python -m SimpleHTTPServer [port] inside /usr/share/qgis/doc/api. You’ll find the documentation at http://localhost:8000 (if you don’t provide port number) and it will be available even when you’re offline.
Basic API objects structure
Before launching QGIS, take a look at what’s available inside API:
- qgis.core package brings all the basic objects like QgsMapLayer, QgsDataSourceURI, QgsFeature etc
- qgis.gui package brings GUI elements that can be used within QGIS like QgsMessageBar or QgsInterface (very important API element, exposed to all custom plugins)
- qgis.analysis, qgis.networkanalysis, qgis.server, and qgis.testing packages that won’t be covered in the series
- qgis.utils module that comes with
iface exposed (very handy within QGIS Python console)
QGIS Python Console
Using Python console is the easiest way to automate your QGIS workflow. It can be accessed via pressing Ctrl + Alt + P or navigating to Plugins -> Python Console. Note the above mentioned iface from qgis.utils module is exposed by default within the console, letting you interact with QGIS GUI. Try out the following examples.
iface.mapCanvas().scale() # returns the current map scale
iface.mapCanvas().zoomScale(100) # zoom to scale of 1:100
iface.activeLayer().name() # get the active layer name
iface.activeLayer().startEditing() # toggle editting
That was a very brief introduction to QGIS API, the next part will walk you through the console more thoroughly.
Since version 2.4.0, PostGIS can serve MVT data directly. MVT returning queries put heavy workload on the database though. On top of that, each of the query has to be run again every time a client demands the data. This leaves us with plenty of room to optimize the process.
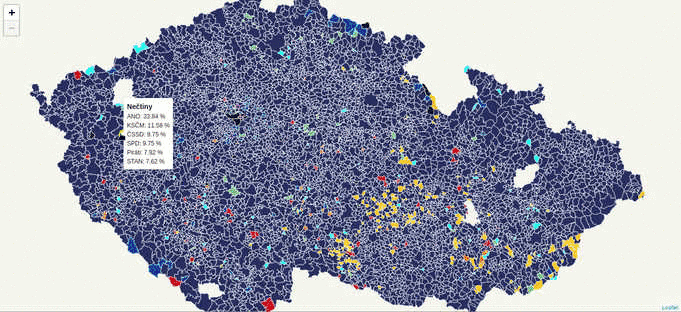
During the last week, while working on the Czech legislative election data visualization, I’ve struggled with the server becoming unresponsive far too often due to the issues mentioned above.
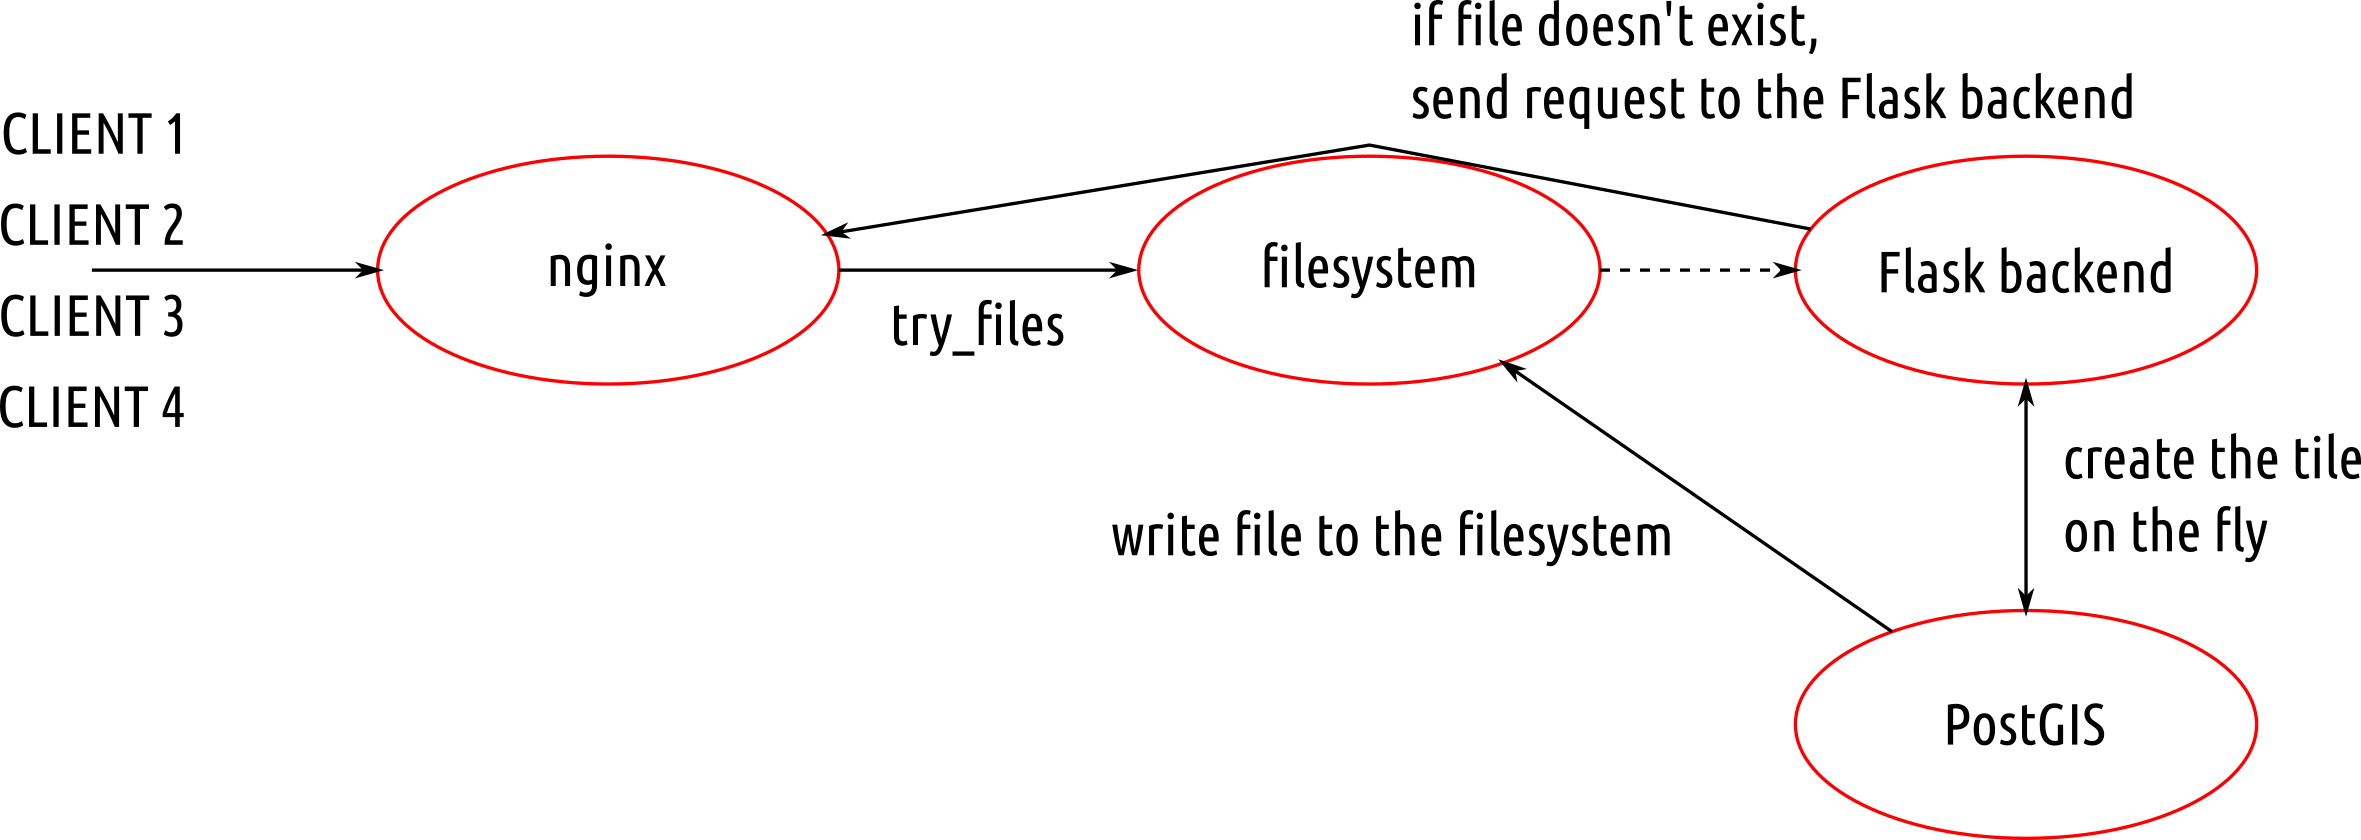
According to the schema, the first client to come to the server:
- goes through filesystem unstopped, because there are no cached files yet,
- continues to the Flask backend and asks for a file at
{z}/{x}/{y},
- Flask backend asks the database to return the MVT for the given tile,
- Flask backend writes the response to the filesystem and sends it to the client.
Other clients get tiles directly from the filesystem, leaving the database at ease.
Nginx
Nginx is fairly simple to set up, once you know what you’re doing. The /volby-2017/municipality/ location serves static MVT from the given alias directory. If not found, the request is passed to @postgis location, that asks the Flask backend for the response.
server election {
    location /volby-2017/municipality {
            alias /opt/volby-cz-2017/server/cache/;
            try_files $uri @postgis;
    }

    location @postgis {
            include uwsgi_params;
            uwsgi_pass 127.0.0.1:5000;
    }
}
Flask backend
Generating static MVT in advance
If you’re going to serve static tiles that don’t change often, it might be a good idea to use PostGIS to create files in advance and serve them with Nginx.
CREATE TABLE tiles (
    x integer,
    y integer,
    z integer,
    west numeric,
    south numeric,
    east numeric,
    north numeric,
    geom geometry(POLYGON, 3857)
);
Using mercantile, you can create the tiles table holding the bounding boxes of the tiles you need. PostGIS them inserts the actual MVT into the mvt table.
CREATE TEMPORARY TABLE tmp_tiles AS
    SELECT
        muni.muni_id,
        prc.data,
        ST_AsMVTGeom(
            muni.geom,
            TileBBox(z, x , y, 3857),
            4096,
            0,
            false
        ) geom,
        x,
        y,
        z
    FROM muni
    JOIN (
        SELECT
            x,
            y,
            z,
            geom
        FROM tiles
    ) bbox ON (ST_Intersects(muni.geom, bbox.geom))
    JOIN party_results_cur prc ON (muni.muni_id = prc.muni_id);
CREATE TABLE mvt (mvt bytea, x integer, y integer, z integer);
DO
$$
DECLARE r record;
BEGIN
FOR r in SELECT DISTINCT x, y, z FROM tmp_tiles LOOP
    INSERT INTO mvt
    SELECT ST_AsMVT(q, 'municipality', 4096, 'geom'), r.x, r.y, r.z
    FROM (
        SELECT
            muni_id,
            data,
            geom
        FROM tmp_tiles
        WHERE (x, y, z) = (r)
    ) q;
    RAISE INFO '%', r;
END LOOP;
END;
$$;
Once filled, the table rows can be written to the filesystem with the simple piece of Python code.
#!/usr/bin/env python

import logging
import os
import time
from sqlalchemy import create_engine, text

CACHE_PATH="cache/"

e = create_engine('postgresql:///')
conn = e.connect()
sql=text("SELECT mvt, x, y, z FROM mvt")
query = conn.execute(sql)
data = query.cursor.fetchall()

for d in data:
    cachefile = "{}/{}/{}/{}".format(CACHE_PATH, d[3], d[1], d[2])
    print(cachefile)

    if not os.path.exists("{}/{}/{}".format(CACHE_PATH, d[3], d[1])):
        os.makedirs("{}/{}/{}".format(CACHE_PATH, d[3], d[1]))

    with open(cachefile, "wb") as f:
        f.write(bytes(d[0]))
Conclusion
PostGIS is a brilliant tool for generating Mapbox vector tiles. Combined with Python powered static file generator and Nginx, it seems to become the only tool needed to get you going.
Yesterday I spent two very unpleasant hours debugging the weirdest SQL error I’ve seen in my life, running the below query (simplified for this post).
psql -qAt --no-psqlrc <<BACKUP
DO
$$
DECLARE r record;
BEGIN
  RAISE INFO '%', 'info';
END
$$;
BACKUP
Running this in your terminal will result in a nasty syntax error.
ERROR:  syntax error at or near "1111"
LINE 2: 1111
        ^
ERROR:  syntax error at or near "RAISE"
LINE 2:   RAISE INFO '%', 'info';
          ^
ERROR:  syntax error at or near "1111"
LINE 2: 1111;
You stare on the screen for a while, absolutely sure that number 1111 is nowhere close to the data you work with. You try again. Another error. You save the code into a file and try again. It works. What the heck? You try again using the bash heredoc. Another failure.
The minute you realize $$ is being substituted with the ID of the current process, you feel like the dumbest person on Earth. Yet the happiest one at the same time.
The solution is trivial.
psql -qAt --no-psqlrc <<BACKUP
DO
\$\$
DECLARE r record;
BEGIN
  RAISE INFO '%', 'info';
END
\$\$;
BACKUP