Articles tagged with QGIS tag
Good news, everyone! The AttributeTransfer plugin has been approved for QGIS Python Plugins Repository. It’s available via QGIS Manage and Install Plugins menu. Feel free to download!
Nevertheless, this post (the last in the series) covers QGIS plugin testing rather than my personal feelings about the aforementioned success.
Testing means mocking
To test a QGIS plugin you need to simulate the environment it’s meant to run in. And that environment is obviously QGIS itself, yet it’s not feasible to launch QGIS every time you run a test. Luckily, there’s a great QGIS mock that gets you going in no time (it completely slipped my mind where I found that piece of code though).
Testing means you need data
Every test is run again and again, which means it has to reset the data being used to its default state. This might be a PIDA if the test changes the data in an unpredictable manner.
Using QGIS memory layers you can prepare fresh data for each of your tests, effectively putting the whole data manipulation process aside.
Writing tests
Each of the AttributeTransfer plugin tests inherits from unittest.TestCase, which comes with several methods you might be familiar with from other languages: setUp() is run before for every test method, while tearDown() is run after each of them. Tests are defined as methods whose names start with the word test.
Each test should call some assertWhatever method that checks whether the test passed or failed. Here’s an example of such a test covering non-point layers.
#!/usr/bin/env python
# -*- coding: utf-8 -*-
# @Date    : 2017-11-18 18:40:50
# @Author  : Michal Zimmermann <[email protected]>

import os
import sip
import sys
import unittest
from qgis.core import QgsMapLayerRegistry, QgsVectorLayer, QgsFeature, QgsGeometry, QgsPoint
from utilities import get_qgis_app

sys.path.append(os.path.dirname(os.path.abspath(__file__)) + "/..")
from attribute_transfer import AttributeTransfer
from create_dummy_data import create_dummy_data_polygon_or_line

sip.setapi('QtCore', 2)
sip.setapi('QString', 2)
sip.setapi('QDate', 2)
sip.setapi('QDateTime', 2)
sip.setapi('QTextStream', 2)
sip.setapi('QTime', 2)
sip.setapi('QUrl', 2)
sip.setapi('QVariant', 2)

QGIS_APP = get_qgis_app()
IFACE = QGIS_APP[2]


class AttributeTransferTestPolygonOrLine(unittest.TestCase):

    def setUp(self):
        self.source_layer = QgsVectorLayer(
            "Polygon?crs=epsg:4326&field=id:integer&field=textAttr:string&field=intAttr:integer&field=decAttr:double&field=dateAttr:date&index=yes", "source layer", "memory")
        self.target_layer = QgsVectorLayer(
            "Linestring?crs=epsg:4326&field=id:integer&index=yes", "target layer", "memory")
        self.widget = AttributeTransfer(IFACE)

        registry = QgsMapLayerRegistry.instance()
        registry.removeAllMapLayers()
        registry.addMapLayers([self.source_layer, self.target_layer])
        create_dummy_data_polygon_or_line(self.source_layer, self.target_layer)
        self.widget.initGui()
        self.widget.vectors = [self.source_layer, self.target_layer]
        self.widget.editable_vectors = [self.source_layer, self.target_layer]
        self.widget.dlg.sourceLayer.addItems(["source layer", "target layer"])

    def test_text_attr(self):
        ATTRIBUTE_NAME = "textAttr"
        ATTRIBUTE_INDEX = 1

        self._test_attr(ATTRIBUTE_NAME, ATTRIBUTE_INDEX)

    def test_int_attr(self):
        ATTRIBUTE_NAME = "intAttr"
        ATTRIBUTE_INDEX = 2

        self._test_attr(ATTRIBUTE_NAME, ATTRIBUTE_INDEX)

    def test_dec_attr(self):
        ATTRIBUTE_NAME = "decAttr"
        ATTRIBUTE_INDEX = 3

        self._test_attr(ATTRIBUTE_NAME, ATTRIBUTE_INDEX)

    def test_date_attr(self):
        ATTRIBUTE_NAME = "dateAttr"
        ATTRIBUTE_INDEX = 4

        self._test_attr(ATTRIBUTE_NAME, ATTRIBUTE_INDEX)

    def test_existing_attr(self):
        ATTRIBUTE_NAME = "id"
        ATTRIBUTE_INDEX = 0

        self.widget.dlg.sourceAttribute.setCurrentIndex(ATTRIBUTE_INDEX)
        self.widget.dlg.targetAttribute.setText(ATTRIBUTE_NAME)

        self.assertEqual(
            self.widget.dlg.sourceAttribute.currentText(), ATTRIBUTE_NAME)
        self.assertFalse(self.widget.transfer())

    def _test_attr(self, attr_name, attr_index):
        self.widget.dlg.sourceAttribute.setCurrentIndex(attr_index)
        self.widget.dlg.targetAttribute.setText(attr_name)

        self.assertEqual(
            self.widget.dlg.sourceAttribute.currentText(), attr_name)

        self.widget.transfer()

        target_fields = [f.name()
                         for f in self.target_layer.dataProvider().fields()]
        self.assertIn(attr_name, target_fields)

        source_features = [f for f in self.source_layer.getFeatures()]
        target_features = [f for f in self.target_layer.getFeatures()]

        for idx, f in enumerate(source_features):
            self.assertEqual(f.attribute(attr_name), target_features[
                             idx].attribute(attr_name))


if __name__ == "__main__":
    unittest.main()
This part finally brings the whole source code of the QGIS AttributeTransfer plugin.
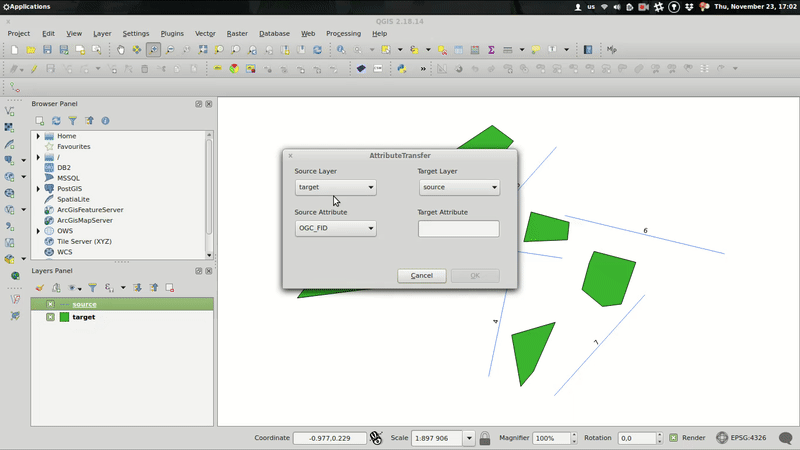
The plugin itself resides in the attribute_transfer.py file. When run() method is invoked, the QT form pops up with combos prefilled with available vector layers that support attribute editing.
Source and target layer combos are mutually exclusive, thus it’s not possible to transfer the attribute within the same layer.
Coding the plugin, I came across minor issues related mainly to the QgsSpatialIndex implementation. In the nearest neighbor analysis part of the series, the QgsSpatialIndex.nearestNeighbor method was mentioned. Yet, as I found out, this method only works with QgsPoint geometries. Those are impossible to get from QgsPolygon or QgsPolyline, though. What can one possibly do, facing such a misfortune? Well… draw a solution matrix.
|
point |
line |
polygon |
| point |
QgsSpatialIndex.nearestNeighbor |
QgsSpatialIndex.nearestNeighbor; layers have to be switched, e.g. source layer = line |
QgsSpatialIndex.nearestNeighbor; layers have to be switched, e.g. source layer = polygon |
| line |
QgsSpatialIndex.nearestNeighbor |
QgsSpatialIndex.intersects with QgsGeometry.distance |
QgsSpatialIndex.intersects with QgsGeometry.distance |
| polygon |
QgsSpatialIndex.nearestNeighbor |
QgsSpatialIndex.intersects with QgsGeometry.distance |
QgsSpatialIndex.intersects with QgsGeometry.distance |
Using the spatial index brings one more issue I’ve come to realize just after implementing the special comparison workflows for different geometry types. There’s a chance of finding the nearest feature using the bounding box that’s actually not the nearest feature. In that case, I chose to find the most distant vertex of such a feature and use it to construct the rectangle around the target feature. If there are any source features in such a rectangle, it’s very likely one of them is the real nearest feature.
Right now, I’m working on finding the nearest feature even if no bounding box intersection is found. Meanwhile, the plugin is being reviewed to be featured in QGIS Plugins repository. Fingers crossed.
I thought this was going to be the last part of the series. But how could one possibly claim the coding project done without writing tests? Stay tuned for the next episode.
After fiddling with QGIS Python console and implementing nearest neighbor analysis, I’m going to create a very simple GUI for the plugin at last.
While QGIS API docs took me few hours to grasp, the PyQGIS ecosystem knocked my socks off. Here comes the list of tools you should incorporate into your development process as soon as possible.
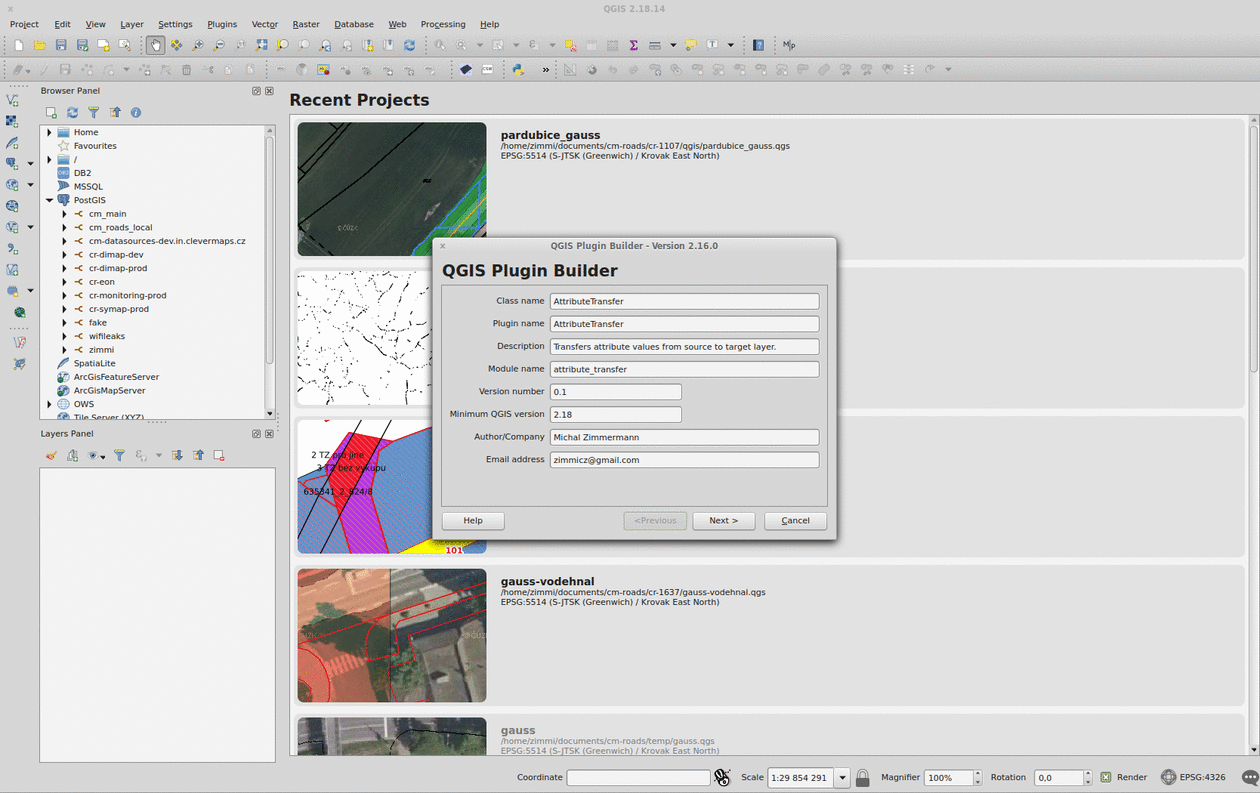
Plugin Builder
The QGIS Plugin Builder is a plugin created to create… well, other plugins. It gets you going in minutes and lets you code instead of setting up things you don’t want to be setting up. A definite must-have. Note you should put the plugin inside the QGIS plugins folder (defaults to ~/.qgis2/python/plugins) in Linux.
Remember to run pyrcc4 -o resources.py resources.qrc inside your plugin folder before you add it to QGIS.
Plugin Reloader
The QGIS Plugin Reloader is a plugin (possibly created with QGIS Plugin Builder) that lets you live reload your plugin while you code. No QGIS restarts needed. A definite must-have.
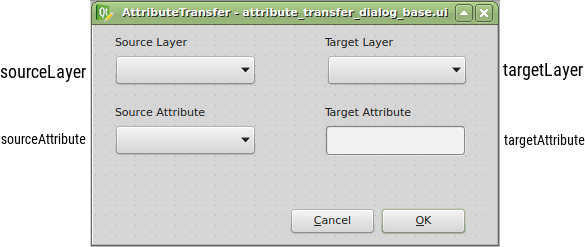
Qt Designer
Qt Designer comes with qt4-designer package in Ubuntu. It is tailored to design and build GUIs from Qt components that can be used within QGIS. Its drag&drop interface lets you prototype quickly.
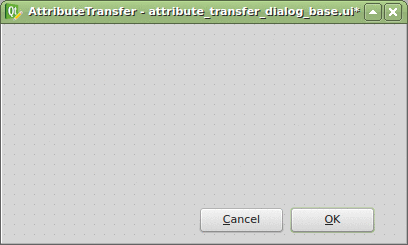
Thanks to the Plugin Builder you can load the attribute_transfer_dialog_base.ui file straight into the Qt Designer and adjust it to your needs.
It doesn’t take much, just one QLineEdit and a few QComboBox widgets. Those will be available in the attribute_transfer.py file as properties of the AttributeTransferDialog class.
The widget name can be customized in the right sidebar and I advise you to do so. I chose the following:
Once loaded with Plugins -> Manage and Install Plugins -> AttributeTransfer, the plugin is available right from the toolbar or Vector menu. It is missing the business logic completely, but I have this covered in the previous part.
All that is to be done is to bind those two parts together.
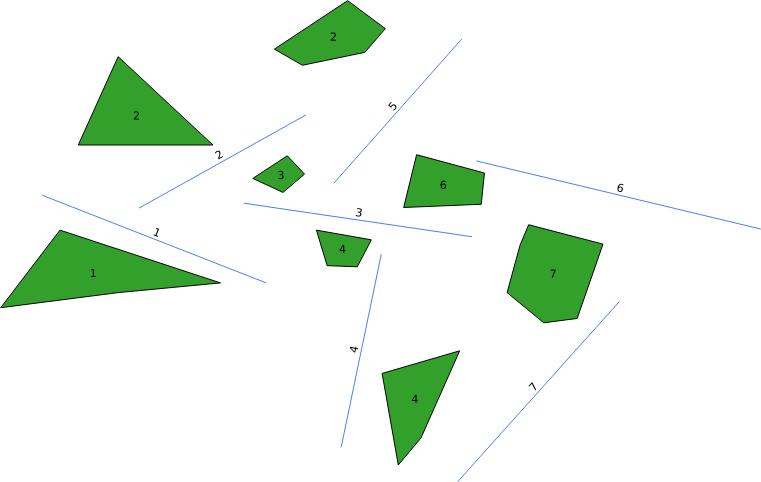
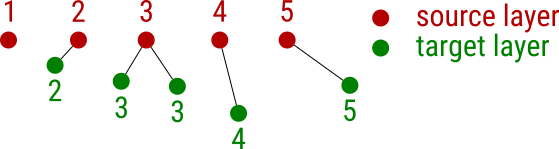
I described basics of vector layers manipulation in the previous part of the series. With my goal in mind (fully functional custom plugin capable of writing an attribute value from a source layer to a target layer based on a feature distance), I’d like to discuss spatial indexing and nearest neighbor analysis.
The picture above illustrates the task that can be solved solely by using QGIS API. Imagine you’re given a source layer with an attribute filled with values. You’re given a target layer as well, sadly though, the values in this layer are missing (not so rare in the GIS world, right?). Yet you know that the missing attribute value of each feature in the target layer can be filled by the value of its nearest neighbor from the source layer. How do you do that?
Generating dummy data
Let’s create two memory data sets with id and value attributes. Both of them will have ten features.
from qgis.core import QgsMapLayerRegistry, QgsVectorLayer, QgsFeature, QgsGeometry, QgsPoint, QgsSpatialIndex
from qgis.utils import iface

source_layer = QgsVectorLayer("point?crs=epsg:4326&field=id:integer&field=value:integer", "Source layer", "memory")
target_layer = QgsVectorLayer("point?crs=epsg:4326&field=id:integer&field=value:integer", "Target layer", "memory")

def create_dummy_data():

    source_layer.startEditing()
    target_layer.startEditing()

    feature = QgsFeature(source_layer.pendingFields())

    for i in range(10):
        feature.setGeometry(QgsGeometry.fromPoint(QgsPoint(i, i)))
        feature.setAttribute("id", i)
        feature.setAttribute("value", i)
        source_layer.addFeature(feature)

    feature = QgsFeature(source_layer.pendingFields())

    for i in range(10):
        feature.setGeometry(QgsGeometry.fromPoint(QgsPoint(i + i, i)))
        feature.setAttribute("id", i)
        target_layer.addFeature(feature)

    source_layer.commitChanges()
    target_layer.commitChanges()

    QgsMapLayerRegistry.instance().addMapLayer(source_layer)
    QgsMapLayerRegistry.instance().addMapLayer(target_layer)

create_dummy_data()
Writing values from the nearest neighbor
The actual nearest neighbor analysis can be done in ten lines of code! First, the qgis.core.QgsSpatialIndex is built from all the source_layer features. Then, you iterate over the target_layer features and for each of them, gets only one (nearestNeighbor(f.geometry().asPoint(), 1)[0]) nearest neighbor. At last, you just write the nearest neighbor’s attribute value to the target layer and commit changes. Just use the following code with the code above.
def write_values_from_nn():
    source_layer_index = QgsSpatialIndex(source_layer.getFeatures())
    source_layer_features = {feature.id(): feature for (feature) in source_layer.getFeatures()}
    target_layer_features = target_layer.getFeatures()

    target_layer.startEditing()

    for f in target_layer_features:
        nearest = source_layer_index.nearestNeighbor(f.geometry().asPoint(), 1)[0]
        value = source_layer_features[nearest].attribute("value")
        target_layer.changeAttributeValue(f.id(), 1, value)

    target_layer.commitChanges()

write_values_from_nn()
Missing pieces or what’s next
I’m one step closer to my goal. What’s missing?
- capabilities checks: does the target layer support edits? Check the layer data provider capabilities to find out.
- user logging: notices, warnings or errors are completely missing. It will be great to have them shown inside
qgis.gui.QgsMessageBar.
- custom attributes: this version expects both layers to have the same attribute with the same data type.
- GUI: a very simple PyQt widget will turn this console-based script into a custom plugin. That’s what’s going to be next.
As mentioned in previous part of the series, the QGIS Python console is an entry point to GIS workflow automation within QGIS. Remember there’s an iface object representing qgis.gui.QgisInterface instance within the console that gives you access to the whole QGIS GUI. Let’s see what we can do inside the console.
Loading vector layers folder
import glob
from qgis.core import QgsMapLayerRegistry, QgsVectorLayer

def load_folder(folder):
    VALID_EXTENSIONS = ('.geojson', '.gpkg', '.shp')
    files = [f for f in glob.glob("{}/*".format(folder)) if f.endswith(VALID_EXTENSIONS)]

    for f in files:
        layer = QgsVectorLayer(f, f.split('/')[-1], 'ogr')

        if not layer.isValid():
            iface.messageBar().pushCritical("Failed to load:", f)
            continue

        QgsMapLayerRegistry.instance().addMapLayer(layer)

load_folder("path/to/your/vector/files/folder")
QgsMapLayerRegistry represents Layers Panel as present in the QGIS GUIiface.messageBar() returns the message bar of the main app and lets you notify the user of what’s going on under the hoodQgsVectorLayer represents a vector layer with its underlying vector data sets
Editing active layer attribute table
The following code demonstrates the possibility to edit vector layer attribute table via console.
- Any attribute to be written has to come in form of a
qgis.core.QgsField - this is more or less an encapsulation of an attribute name and its type (PyQt4.QtCore.QVariant to be precise)
- The underlying data provider has to be capable of attribute addition (
caps & QgsVectorDataProvider.AddAttributes)
QgsVectorLayer.addAttribute method returns boolean rather than throwing an exception
from qgis.core import QgsField
from qgis.gui import QgsMessageBar
from PyQt4.QtCore import QVariant


def edit_active_layer(attr_name, attr_type):
    layer = iface.activeLayer()
    caps = layer.dataProvider().capabilities()

    if caps & QgsVectorDataProvider.AddAttributes:
        layer.startEditing()
        if layer.addAttribute(QgsField(attr_name, attr_type)):
            iface.messageBar().pushMessage("Attribute {0} was successfully added to the active layer.".format(attr_name), QgsMessageBar.SUCCESS)
            layer.commitChanges()
        else:
            iface.messageBar().pushMessage("Attribute {0} was not added. Does it already exist?".format(attr_name), QgsMessageBar.CRITICAL)
            layer.rollBack()

edit_active_layer("new_string_attribute", QVariant.String)
The whole series aims to present a plugin capable of writing a new attribute and its value to an existing layer. Thus, this code might come handy in the future.
Creating a new vector layer
It’s possible to create a whole new vector layer with QGIS Python console. I present a very simple create_new_layer function, yet I hope you can imagine the ways it can be tweaked.
from qgis.core import QgsField, QgsFields, QgsVectorLayer, QgsFeature, QgsGeometry, QgsPoint
from PyQt4.QtCore import QVariant

def create_new_layer():
    filename = "/path/to/your/vector/file.gpkg"

    fields = QgsFields()
    fields.append(QgsField("attr1", QVariant.String))
    fields.append(QgsField("attr2", QVariant.Int))

    file = QgsVectorFileWriter(
        filename,
        "UTF8",
        fields,
        QGis.WKBPoint,
        QgsCoordinateReferenceSystem(4326),
        "GPKG"
    )

    layer = QgsVectorLayer(filename, filename.split("/")[-1], "ogr")
    QgsMapLayerRegistry.instance().addMapLayer(layer)

    if not layer.dataProvider().capabilities() & QgsVectorDataProvider.AddAttributes:
        pass

    feature = QgsFeature(layer.pendingFields())
    feature.setGeometry(QgsGeometry().fromPoint(QgsPoint(0, 0)))
    feature.setAttribute("attr1", "attr1")
    feature.setAttribute("attr2", 2)

    layer.startEditing()

    if layer.addFeature(feature, True):
        layer.commitChanges()
    else:
        layer.rollBack()
        iface.messageBar().pushMessage("Feature addition failed.", QgsMessageBar.CRITICAL)

create_new_layer()
Those were just few examples of what can be done with QGIS API and Python console. Next time, I’d like to focus on spatial joins inside QGIS - another step to the final plugin.