PostGIS 2.4.0 was released recently bringing the possibilities to generate Mapbox Vector Tiles without any third party tools. I got a shot at it with Node.js and docker. Even if it’s not as straightforward as solely using ST_AsMVT, it still looks pretty great.
Docker container
There are no Ubuntu or Debian based PostGIS 2.4.0 packages as far as I know. As installation from source (especially considering GIS software) is always a bit risky, I prefer using Docker to stay away from trouble. The image is based on Ubuntu 17.04, has PostgreSQL 9.6 and PostGIS 2.4.0 installed. It exposes port 5432 to the host, so you can access the database from the outside the container.
FROM ubuntu:17.04
RUN apt update
RUN apt install -y wget less systemd
RUN touch /etc/apt/sources.list.d/pgdg.list
RUN echo "deb http://apt.postgresql.org/pub/repos/apt/ zesty-pgdg main" > /etc/apt/sources.list.d/pgdg.list
RUN wget --quiet -O - https://www.postgresql.org/media/keys/ACCC4CF8.asc | apt-key add -
RUN apt update
RUN apt -y install postgresql-9.6 postgresql-server-dev-9.6

USER postgres
RUN /usr/lib/postgresql/9.6/bin/pg_ctl -D /var/lib/postgresql/9.6/main -l /tmp/logfile start

USER root
RUN echo "host all  all    0.0.0.0/0  trust" >> /etc/postgresql/9.6/main/pg_hba.conf && \
    echo "listen_addresses='*'" >> /etc/postgresql/9.6/main/postgresql.conf


EXPOSE 5432
RUN apt install -y netcat build-essential libxml2 libxml2-dev libgeos-3.5.1 libgdal-dev gdal-bin libgdal20 libgeos-dev libprotobuf-c1 libprotobuf-c-dev libprotobuf-dev protobuf-compiler protobuf-c-compiler
RUN wget http://download.osgeo.org/postgis/source/postgis-2.4.0alpha.tar.gz
RUN tar -xvzf postgis-2.4.0alpha.tar.gz
RUN cd postgis-2.4.0alpha && ./configure && make && make install

USER postgres
RUN service postgresql start && psql -c "CREATE EXTENSION postgis"

USER root
COPY start.postgis.sh /start.postgis.sh
RUN chmod 0755 /start.postgis.sh

CMD ["/start.postgis.sh"]
start.postgis.sh file starts the database server and keeps it running forever.
#!/bin/bash

DATADIR="/var/lib/postgresql/9.6/main"
CONF="/etc/postgresql/9.6/main/postgresql.conf"
POSTGRES="/usr/lib/postgresql/9.6/bin/postgres"

su postgres sh -c "$POSTGRES -D $DATADIR -c config_file=$CONF" &
until nc -z localhost 5432;
do
    echo ...
    sleep 5
done
sleep 5 # just for sure
su - postgres -c "psql -c \"CREATE EXTENSION IF NOT EXISTS postgis\""
echo database up and running

wait $!
Data
I got a cadastre area dataset of the Czech Republic for testing, which contains ~ 13,000 polygons. The geometries should come in Web Mercator a.k.a. EPSG:3857 to work with MVT.
Vector tiles
I got a bit confused by the docs of ST_AsMVT and ST_AsMVTGeom. Especially the latter one took me a few hours to get it right. What is essential (I guess) about Mapbox Vector Tiles is that you have to abstract from the real world coordinates and start thinking inside the tile coordinates. What PostGIS does with ST_AsMVTGeom (and what any other MVT implemenation should do for you) is that it takes real world coordinates and put them inside a tile.
To make this work, you need to know every bounding box of every tile on every zoom level in a Web Mercator projection. Or you can use TileBBox procedure by Mapbox, if you wish.
The SQL query itself is pretty simple (this comes from an express route I’ll be discussing shortly).
SELECT ST_AsMVT('cadastre', 4096, 'geom', q)
FROM (
    SELECT
        code,
        name,
        ST_AsMVTGeom(
            geom,
            TileBBox(${req.params.z}, ${req.params.x}, ${req.params.y}, 3857),
            4096,
            0,
            false
        ) geom
    FROM cadastre_area
    WHERE ST_Intersects(geom, (SELECT ST_Transform(ST_MakeEnvelope($1, $2, $3, $4, $5), 3857)))
) q
When filled with proper arguments instead of placeholders, it returns a bytea.
\x1aa5dbd0070a047465737412e216120400000101180322d7160987913f8db38e01aa59160e2a010412012a0624060e001410420a1a00203b0a3914190e15085912010a0f0c0f06370804080a0e0e0234090e0
This can be consumed by a Leaflet map using Leaflet.VectorGrid plugin. To keep it short, the frontend code actually boils down to three lines of code.
var url = 'http://localhost:3000/mvt/{x}/{y}/{z}';
var cadastre = L.vectorGrid.protobuf(url);
map.addLayer(cadastre);
The server MVP is available as a GitHub gist.
For a long time I’ve wanted to play with pgRouting and that time has finally come. Among many other routing functions there is one that caught my eye, called pgr_drivingdistance. As the documentation says, it returns the driving distance from a start node using Dijkstra algorithm. The aforementioned distance doesn’t need to be defined in Euclidean space (the real distance between two points), it might be calculated in units of time, slopeness etc. How to get it going?
Data
OSM will do as it always does. There is a tool called osm2pgrouting to help you load the data, the pure GDAL seems to be a better way to me though. Importing the downloaded data is trivial.
ogr2ogr -f "PostgreSQL" PG:"dbname=pgrouting active_schema=cze" \
-s_srs EPSG:4326 \
-t_srs EPSG:5514 \
roads.shp \
-nln roads \
-lco GEOMETRY_NAME=the_geom \
-lco FID=id \
-gt 65000� \
-nlt PROMOTE_TO_MULTI \
-clipsrc 16.538 49.147 16.699 49.240
To route the network, it has to be properly noded. Although pgRouting comes with built-in pgr_nodenetwork, it didn’t seem to work very well. To node the network, use PostGIS ST_Node. Note this doesn’t consider bridges and tunnels.
CREATE TABLE cze.roads_noded AS
SELECT
    (ST_Dump(geom)).geom the_geom
FROM (
    SELECT
        ST_Node(geom) geom
    FROM (
        SELECT ST_Union(the_geom) geom
        FROM cze.roads
    ) a
) b;
After noding the network, all the information about speed limits and oneways is lost. If needed, it can be brought back with following:
CREATE INDEX ON cze.roads_noded USING gist(the_geom);
ALTER TABLE cze.roads_noded ADD COLUMN id SERIAL PRIMARY KEY;
ALTER TABLE cze.roads_noded ADD COLUMN maxspeed integer;

UPDATE cze.roads_noded
SET maxspeed = a.maxspeed
FROM (
    SELECT DISTINCT ON (rn.id)
        rn.id,
        r.maxspeed
    FROM cze.roads_noded rn
    JOIN cze.roads r ON (ST_Intersects(rn.the_geom, r.the_geom))
    ORDER BY rn.id, ST_Length(ST_Intersection(rn.the_geom, r.the_geom)) DESC
) a
WHERE cze.roads_noded.id = a.id;
With everything set, the topology can be built.
ALTER TABLE cze.roads_noded ADD COLUMN source integer;
ALTER TABLE cze.roads_noded ADD COLUMN target integer;
SELECT pgr_createTopology('cze.roads_noded', 1);
This function creates the cze.roads_noded_vertices_pgr that contains all the extracted nodes from the network.
As already mentioned, measures other than length can be used as a distance, I chose the time to get to a given node on foot.
ALTER TABLE cze.roads_noded ADD COLUMN cost_minutes integer;
UPDATE cze.roads_noded
SET cost_minutes = (ST_Length(the_geom) / 83.0)::integer; -- it takes average person one minute to walk 83 meters

UPDATE cze.roads_noded
SET cost_minutes = 1
WHERE cost_minutes = 0;
Routing
Now the interesting part. All the routing functions are built on what’s called inner queries that are expected to return a certain data structure with no geometry included. As I want to see the results in QGIS immediately, I had to use a simple anonymous PL/pgSQL block that writes polygonal catchment areas to a table (consider it a proof of concept, not the final solution).
DROP TABLE IF EXISTS cze.temp;
CREATE TABLE cze.temp AS
SELECT *
FROM cze.roads_noded_vertices_pgr ver
JOIN (
    SELECT *
    FROM pgr_drivingDistance(
        'SELECT id, source, target, cost_minutes as cost, cost_minutes as reverse_cost FROM cze.roads_noded',
        6686,
        10,
        true
    )
)dist ON ver.id = dist.node;

DO $$
DECLARE
    c integer;
BEGIN
    DROP TABLE IF EXISTS tmp;
    CREATE TABLE tmp (
        agg_cost integer,
        geom geometry(MULTIPOLYGON, 5514)
    );

    -- order by the biggest area so the polygons are not hidden beneath the bigger ones
    FOR c IN SELECT agg_cost FROM cze.temp GROUP BY agg_cost HAVING COUNT(1) > 3 ORDER BY 1 DESC LOOP
        RAISE INFO '%', c;
        INSERT INTO tmp (agg_cost, geom)
        SELECT
            c,
            ST_Multi(ST_SetSRID(pgr_pointsAsPolygon(
                'SELECT
                        temp.id::integer,
                        ST_X(temp.the_geom)::float AS x,
                        ST_Y(temp.the_geom)::float AS y
                FROM cze.temp
                WHERE agg_cost = ' || c
            ), 5514));
    END LOOP;
END$$;
Using pgr_pointsAsPolygon renders resulting nodes accessible in 10-minute walk in polygons, but weird looking ones. Not bad, could be better though.
How about seeing only nodes instead of polygons?
SELECT
    agg_cost,
    ST_PointN(geom, i)
FROM (
    SELECT
        agg_cost,
        ST_ExteriorRing((ST_Dump(geom)).geom) geom,
        generate_series(0,ST_NumPoints(ST_ExteriorRing((ST_Dump(geom)).geom))) i
    FROM tmp
) a;
Looks good, could be better though.
How about creating concave hulls from the extracted nodes?
SELECT
    agg_cost,
    ST_ConcaveHull(ST_Union(geom)) geom
FROM (
    SELECT
        agg_cost,
        ST_PointN(geom, i) geom
    FROM (
        SELECT
            agg_cost,
            ST_ExteriorRing((ST_Dump(geom)).geom) geom,
            generate_series(0,ST_NumPoints(ST_ExteriorRing((ST_Dump(geom)).geom))) i
        FROM tmp
    ) a
) b
GROUP BY agg_cost
ORDER BY agg_cost DESC;
This one looks the best I guess.
Remarks
- The documentation doesn’t help much.
- I’d expect existing functions to return different data structures to be easy-to-use, actually.
LATERAL might be really handy with those inner queries, have to give it a shot in the future.- Pedestrians usually don’t follow the road network.
- Bridges and tunnels might be an issue.
Thanks to pg_upgrade tool the PostgreSQL upgrade on Ubuntu is pretty straightforward. Different PostGIS versions might cause troubles though. This post covers PostgreSQL 9.5, PostGIS 2.2 to PostgreSQL 9.6, PostGIS 2.3 migration.
First of all, install the PostgreSQL 9.6 with PostGIS 2.3.
apt install postgresql-9.6 postgresql-9.6-postgis-2.3
Mind that newly installed database cluster runs on port 5433.
If you run pg_upgrade at this stage, it will fail with the following error.
could not load library "$libdir/postgis_topology-2.2":
ERROR:  could not access file "$libdir/postgis_topology-2.2": No such file or directory
pg_upgrade can’t run the upgrade because PostGIS versions don’t match. Install the PostGIS 2.3 for PostgreSQL 9.5 and update extensions in all your databases.
apt install postgresql-9.5-postgis-2.3

:::sql
ALTER EXTENSION postgis UPDATE;
With both clusters using the same PostGIS version, the upgrade can begin. First, stop them with
Then, run the actual pg_upgrade command as postgres user. Make sure the pg_hba.conf file is set to allow local connections.
/usr/lib/postgresql/9.6/bin/pg_upgrade \
-b /usr/lib/postgresql/9.5/bin/ \
-B /usr/lib/postgresql/9.6/bin/ \
-d /var/lib/postgresql/9.5/main \
-D /var/lib/postgresql/9.6/main \
-o ' -c config_file=/etc/postgresql/9.5/main/postgresql.conf' \
-O ' -c config_file=/etc/postgresql/9.6/main/postgresql.conf'
The following result means the upgrade was smooth.
Performing Consistency Checks
-----------------------------
Checking cluster versions                                   ok
Checking database user is the install user                  ok
Checking database connection settings                       ok
Checking for prepared transactions                          ok
Checking for reg* system OID user data types                ok
Checking for contrib/isn with bigint-passing mismatch       ok
Checking for roles starting with 'pg_'                      ok
Creating dump of global objects                             ok
Creating dump of database schemas
                                                            ok
Checking for presence of required libraries                 ok
Checking database user is the install user                  ok
Checking for prepared transactions                          ok

If pg_upgrade fails after this point, you must re-initdb the
new cluster before continuing.

Performing Upgrade
------------------
Analyzing all rows in the new cluster                       ok
Freezing all rows on the new cluster                        ok
Deleting files from new pg_clog                             ok
Copying old pg_clog to new server                           ok
Setting next transaction ID and epoch for new cluster       ok
Deleting files from new pg_multixact/offsets                ok
Copying old pg_multixact/offsets to new server              ok
Deleting files from new pg_multixact/members                ok
Copying old pg_multixact/members to new server              ok
Setting next multixact ID and offset for new cluster        ok
Resetting WAL archives                                      ok
Setting frozenxid and minmxid counters in new cluster       ok
Restoring global objects in the new cluster                 ok
Restoring database schemas in the new cluster
                                                            ok
Copying user relation files
                                                            ok
Setting next OID for new cluster                            ok
Sync data directory to disk                                 ok
Creating script to analyze new cluster                      ok
Creating script to delete old cluster                       ok

Upgrade Complete
----------------
Optimizer statistics are not transferred by pg_upgrade so,
once you start the new server, consider running:
    ./analyze_new_cluster.sh

Running this script will delete the old cluster's data files:
    ./delete_old_cluster.sh
The old cluster can be removed and the new one switched back to port 5432. Run /usr/lib/postgresql/9.6/bin/vacuumdb -p 5433 --all --analyze-in-stages to collect statistics.
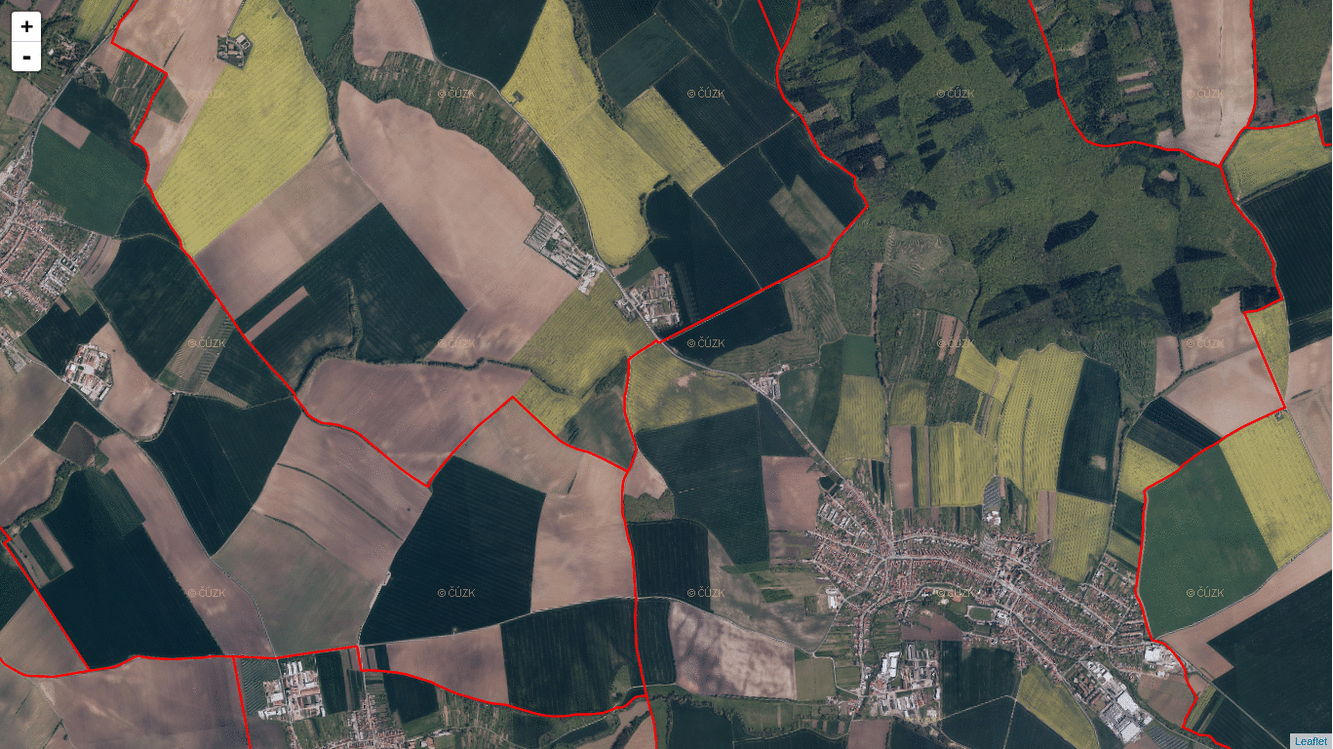
Spatial indexes are absolutely crucial part of any spatial database and - as I tend to say quite often - only a fool would try to query spatial data without building spatial indexes beforehand.
Spatial indexes are based on bounding box comparisons, which are generally very fast. Yet, there are situations when spatial indexes don’t help much (or they don’t help as much as they could, if you wish).
Bounding box comparisons are effective with lots of small bounding boxes rather then few large ones. Why? See the picture above. The curved line (imagine it’s a pipeline for example) clearly demonstrates when the spatial index/bounding box comparison might fall short of what you’d expect.
Once the bounding box gets really big, it intersects so many other geometries’ bounding boxes that the whole comparison starts to slow down.
Luckily, PostGIS 2.2 introduced a ST_Subdivide function that can lend a helping hand in here.
Until today, we delivered the parcel geometries into our real estate acquisition process system with the following query, that takes all the geometries from the req_geom table (pipelines, remember?) and intersects them with cadastral parcels. The second part of the query adds those parcels that haven’t been digitalized and were created manually by one of my workmates.
INSERT INTO requested_parcels (uid, par_id)
SELECT
    reqs.uid,
    b.id par_id
 FROM
    running_requests reqs
 JOIN
    req_geom a ON (reqs.uid = a.uid)
 JOIN
    pargeo b ON (ST_Intersects(a.geom, b.geom))
 UNION
 SELECT
    reqs.uid,
    a.idpar::numeric
 FROM
    running_requests reqs
 JOIN
     req_man a ON (reqs.uid = a.uid);
It’s a perfectly standard query that intersects several request geometries with ~20M parcels, nothing really fancy. Except that it takes 25 minutes to finish. Why? Pipelines, remember?
Yet, the query below takes only 30 seconds to finish (that’s a huge time saver considering that the whole process used to take ~40 minutes)! Why? Because the ST_Subdivide effectively shrinks the req_geom geometries until they have 50 vertices each at most. Such small geometries are perfect input for the bounding box comparison. Remember to call DISTINCT when using ST_Subdivide, you’d probably get duplicate parcel ids otherwise.
I also replaced the UNION with the WHERE NOT EXISTS expression, as it’s reasonable to assume that numeric ids comparison will be faster.
INSERT INTO requested_parcels (uid, par_id)
SELECT DISTINCT
    reqs.uid,
    b.id par_id
 FROM
    running_requests reqs
 JOIN
    (
        SELECT
            uid,
            ST_Subdivide(geom, 50) geom
        FROM
            req_geom
     ) a ON (reqs.uid = a.uid)
 JOIN
     pargeo b ON (ST_Intersects(a.geom, b.geom));

 INSERT INTO requested_parcels (uid, par_id)
 SELECT
     reqs.uid,
     a.idpar::numeric
 FROM
     running_requests reqs
 JOIN
     req_man a ON (reqs.uid = a.uid)
 WHERE NOT EXISTS (
     SELECT 1
     FROM pozadovane_parcely pp
     WHERE pp.par_id = a.idpar
  );